
Ever experienced that heart-stopping moment in Gmail when you hit send on an email prematurely? 🙃
We've all been there...
Whether it's sending an email with the wrong attachment, forgetting to swap out the prospect's name from an email template, or realizing it just wasn't ready for the world to see, trying to undo a sent email can be panic-inducing.
Thankfully, the lifesaver is Gmail's undo send feature, which allows senders to retract messages in an instant. However, the default setting gives you a mere 5 seconds to undo your actions, and let's face it, that's not always enough time to catch and rectify a mistake.
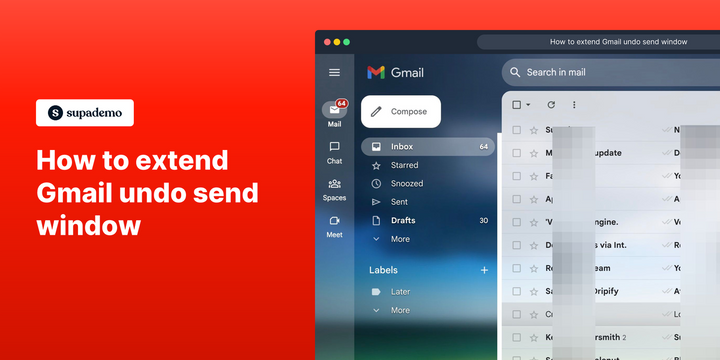
Luckily, here is an visual, interactive guide on how to extend Gmail's undo send window👇
Interactive tutorial
1️⃣ Open Gmail, and click the “Settings” icon on the top right.
2️⃣ Click on "See all settings"
3️⃣ Navigate to the line with "Undo Send" and choose your desired time window.
4️⃣ Use the “Send cancellation period” dropdown to choose from 5, 10, 20 or 30 seconds. We recommend 30 seconds.
5️⃣ To save your changes, scroll to the bottom of the page and click on "Save Changes"!
Common FAQs on Gmail
How do I manage and organize my emails in Gmail?
To manage and organize your emails in Gmail, use labels and filters to categorize and sort your messages. To create a label, go to the left sidebar, click on “More,” then “Create new label.” You can assign labels to emails by selecting the messages, clicking on the “Label” icon at the top, and choosing the appropriate label. Filters allow you to automatically apply labels, archive, or forward messages based on specific criteria. To set up a filter, click on the gear icon, select “See all settings,” go to the “Filters and Blocked Addresses” tab, and create a new filter. Additionally, you can use the “Star” feature to mark important emails and the “Archive” button to keep your inbox clutter-free while retaining messages.
How can I search for specific emails in Gmail?
To search for specific emails in Gmail, use the search bar at the top of the Gmail interface. You can enter keywords, email addresses, or phrases to find relevant messages. For more precise searches, use Gmail’s search operators such as from:, to:, subject:, and has:attachment. For example, entering from:[email protected] will show all emails from that specific address. You can also use advanced search options by clicking on the small arrow in the search bar to open a detailed search form, where you can specify criteria such as date range, attachments, and keywords.
How do I set up and use Gmail’s filters and forwarding options?
To set up filters and forwarding in Gmail, first access the settings by clicking on the gear icon and selecting “See all settings.” For filters, go to the “Filters and Blocked Addresses” tab and click “Create a new filter.” Define the criteria for the filter (e.g., sender, subject, keywords) and choose the actions to apply (e.g., apply a label, delete, forward). To set up email forwarding, go to the “Forwarding and POP/IMAP” tab, click “Add a forwarding address,” and enter the email address where you want your emails to be forwarded. After confirming the forwarding address, you can create filters to forward specific emails or all incoming messages. Make sure to save your changes to apply the filter or forwarding settings.
Create your own step-by-step demo
Scale up your training and product adoption with beautiful AI-powered interactive demos and guides. Create your first Supademo in seconds for free.
