Overview:

Streamline your Miro collaboration with our guide on aligning objects. Optimize your workflow by effortlessly arranging and organizing elements. Enhance user experience with precise alignment, making navigation and collaboration more intuitive. This guide offers a seamless process to align objects in Miro, boosting efficiency and clarity in your collaborative projects.

Who is Miro best suited for?

Miro is best suited for a wide range of professionals, including UX/UI Designers, Product Managers, and Remote Teams. For example, UX/UI Designers can use Miro for creating interactive wireframes and gathering design feedback, Product Managers can leverage it for planning product roadmaps and facilitating brainstorming sessions, and Remote Teams can use it for virtual whiteboarding and collaborative project planning, all benefiting from Miro’s versatile and visual collaboration platform.

How to align objects in Miro

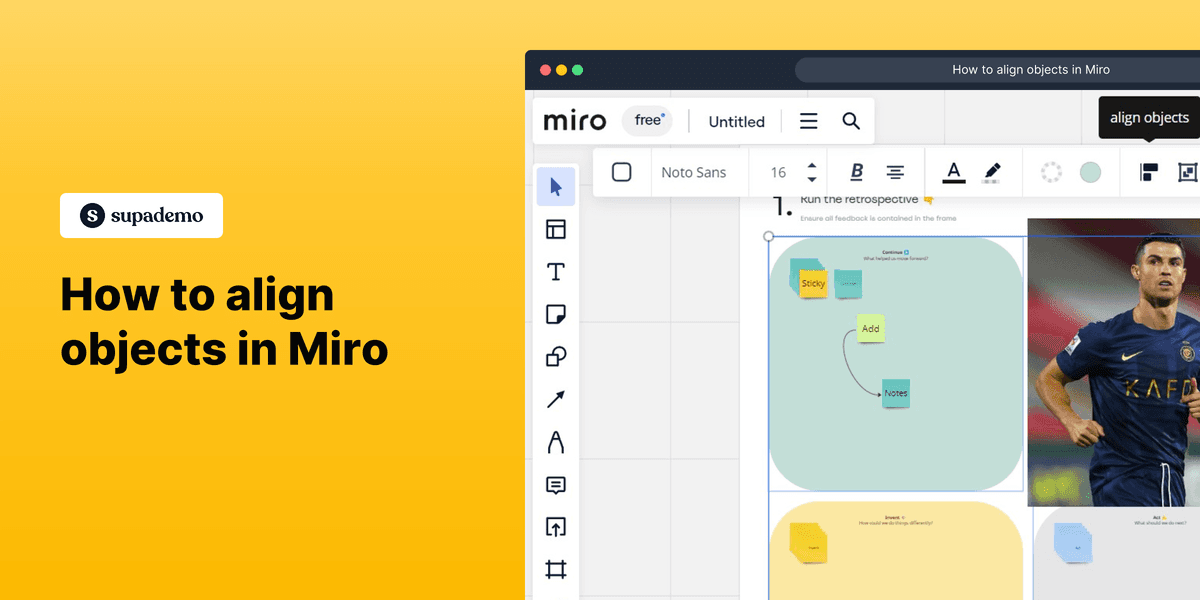
1. Begin by choosing the items you want to adjust.

1 Click here

2. Next up, look for the 'Align Objects' button and click it.

2 Upload

3. Pick your desired alignment from the provided options.

3 Click here

4. Congratulations, you've beautifully arranged your objects as needed!

4 Click here

Common FAQs on Miro

How do I create a board in Miro?

To create a board in Miro, start by logging into your account and clicking on the “+ New Board” button from the dashboard. You can choose to begin with a blank board or select from a variety of pre-built templates that cater to different use cases, such as brainstorming, mind mapping, or project planning. Once your board is created, you can add elements like sticky notes, shapes, text, and images to visualize your ideas. You can also organize content using frames, which act like slides to segment different parts of your board. Boards in Miro are highly customizable, allowing you to adjust layouts, colors, and styles to fit your project’s needs.

How can I collaborate with team members on Miro?

Miro is designed for seamless collaboration, allowing multiple users to work on the same board in real time. To collaborate with others, click on the “Share” button in the top-right corner of your board and invite team members by entering their email addresses or sharing a link. You can control access permissions, deciding whether they can view, comment, or edit the board. Miro also features built-in tools like comments, chat, and live cursors, which allow you to communicate and provide feedback directly on the board. The real-time collaboration feature is ideal for remote teams, as it allows everyone to contribute simultaneously, no matter where they are.

What integrations does Miro support, and how do they enhance productivity?

Miro supports a wide range of integrations that can enhance your productivity by connecting with other tools you use daily. Some popular integrations include Slack, Microsoft Teams, Google Drive, Jira, and Trello. These integrations allow you to link tasks, share files, and streamline communication between Miro and your other apps. For example, you can embed Miro boards into Slack channels or Microsoft Teams to keep everyone updated on project progress. You can also import files from Google Drive directly onto your boards or sync tasks with Jira or Trello to maintain alignment between your Miro boards and your project management tools. To set up integrations, go to the “Apps & Integrations” section in Miro and follow the instructions to connect your preferred tools.

Create your own step-by-step demo

Scale up your training and product adoption with beautiful AI-powered interactive demos and guides. Create your first Supademo in seconds for free.

Get the fastest, easiest interactive demo platform for teams

Sign up