
This article will walk you through how to create an effective Figma demo prototype. In just a few minutes, you can supercharge your existing Figma screens by turning them into an interactive Supademo.
By the end of this post, you'll be able to create your own interactive Figma demo – all in a way that's much faster than through Figma's built-in prototyping functionality.
Interactive prototyping - is it the best way to create a Figma demo?
Figma is a collaborative design and prototyping tool that enables product managers and designers to work together in real time.
Figma operates entirely in the cloud, eliminating the need for local installations and ensuring that everyone is always working with the latest version of a design. This promotes a unified and up-to-date design process. It's an especially valuable tool for product managers and product designers working on designing, validating, and shipping new features.
While the platform offers the ability to create a Figma demo by using interactive prototypes directly, it can be a time-consuming and technically complex process. In addition to this, interactive prototyping on Figma comes with several challenges 👇🏼
Limitations of Figma's interactive prototyping

While creating a simple Figma demo is relatively straightforward, prototyping in Figma does have its downsides.
Hot Take Tuesday:
— John Dilworth (@johndilworth) March 1, 2023
Figma is fantastic for screen design, but it sucks for interaction design.
Prototype mode is just a hair more capable than Invision stitching static screens together 8 years ago.
Good for faking interaction under extreme controlled conditions.
According to users on several blog posts and community posts, the most common limitations of clickable demos on Figma include:
- Traditional Figma demos don't feel like a realistic, polished product;
- Interactive prototypes are time-consuming to build;
- Complicated to link multiple screens and buttons together;
- Interactive Figma demos require a lot of specialized technical know-how;
- Difficult to keep updated or iterate on minor changes;
- Can easily be inferred as a non-working prototype by end users - leading to biases and decreased trust;
- Figma demos are usually not responsive for mobile devices or different screen sizes;
- Can't easily embed onto websites, onboarding, or documentation;
- Unable to easily autoplay the experience like a video;
- Unable to easily add overlays to add context or add CTAs to drive action;
In all, it can be a complicated, time-consuming process to create a polished, clickable prototype demo on Figma.
Luckily there's a better way
Supademo is a platform for creating and sharing beautifully interactive, AI-powered interactive product demos. Using Supademo, teams can communicate more effectively, validate MVPs, and drive product adoption.
Designers and Product Managers can use Supademo's free Figma plugin to create interactive prototypes directly from Figma or quickly create prototypes by bulk uploading existing Figma screens.
How to create interactive Figma prototypes using Suapdemo
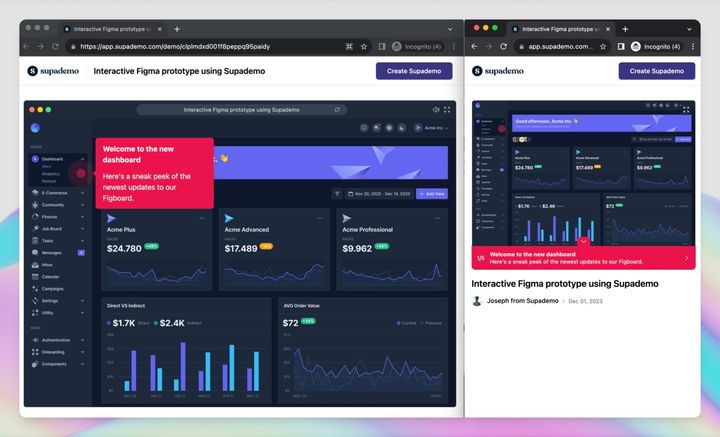
By using Supademo, you can supercharge your existing Figma screens and transform them into a high-fidelity, realistic interactive product demo - ready to be shared or embedded anywhere.
There are two ways you can go about creating interactive Figma prototypes using Supademo:
- Using the Supademo Figma Plugin
- Using the Supademo App
Let's explore these in detail.
Create interactive prototypes directly with the Supademo Figma plugin 👇🏽
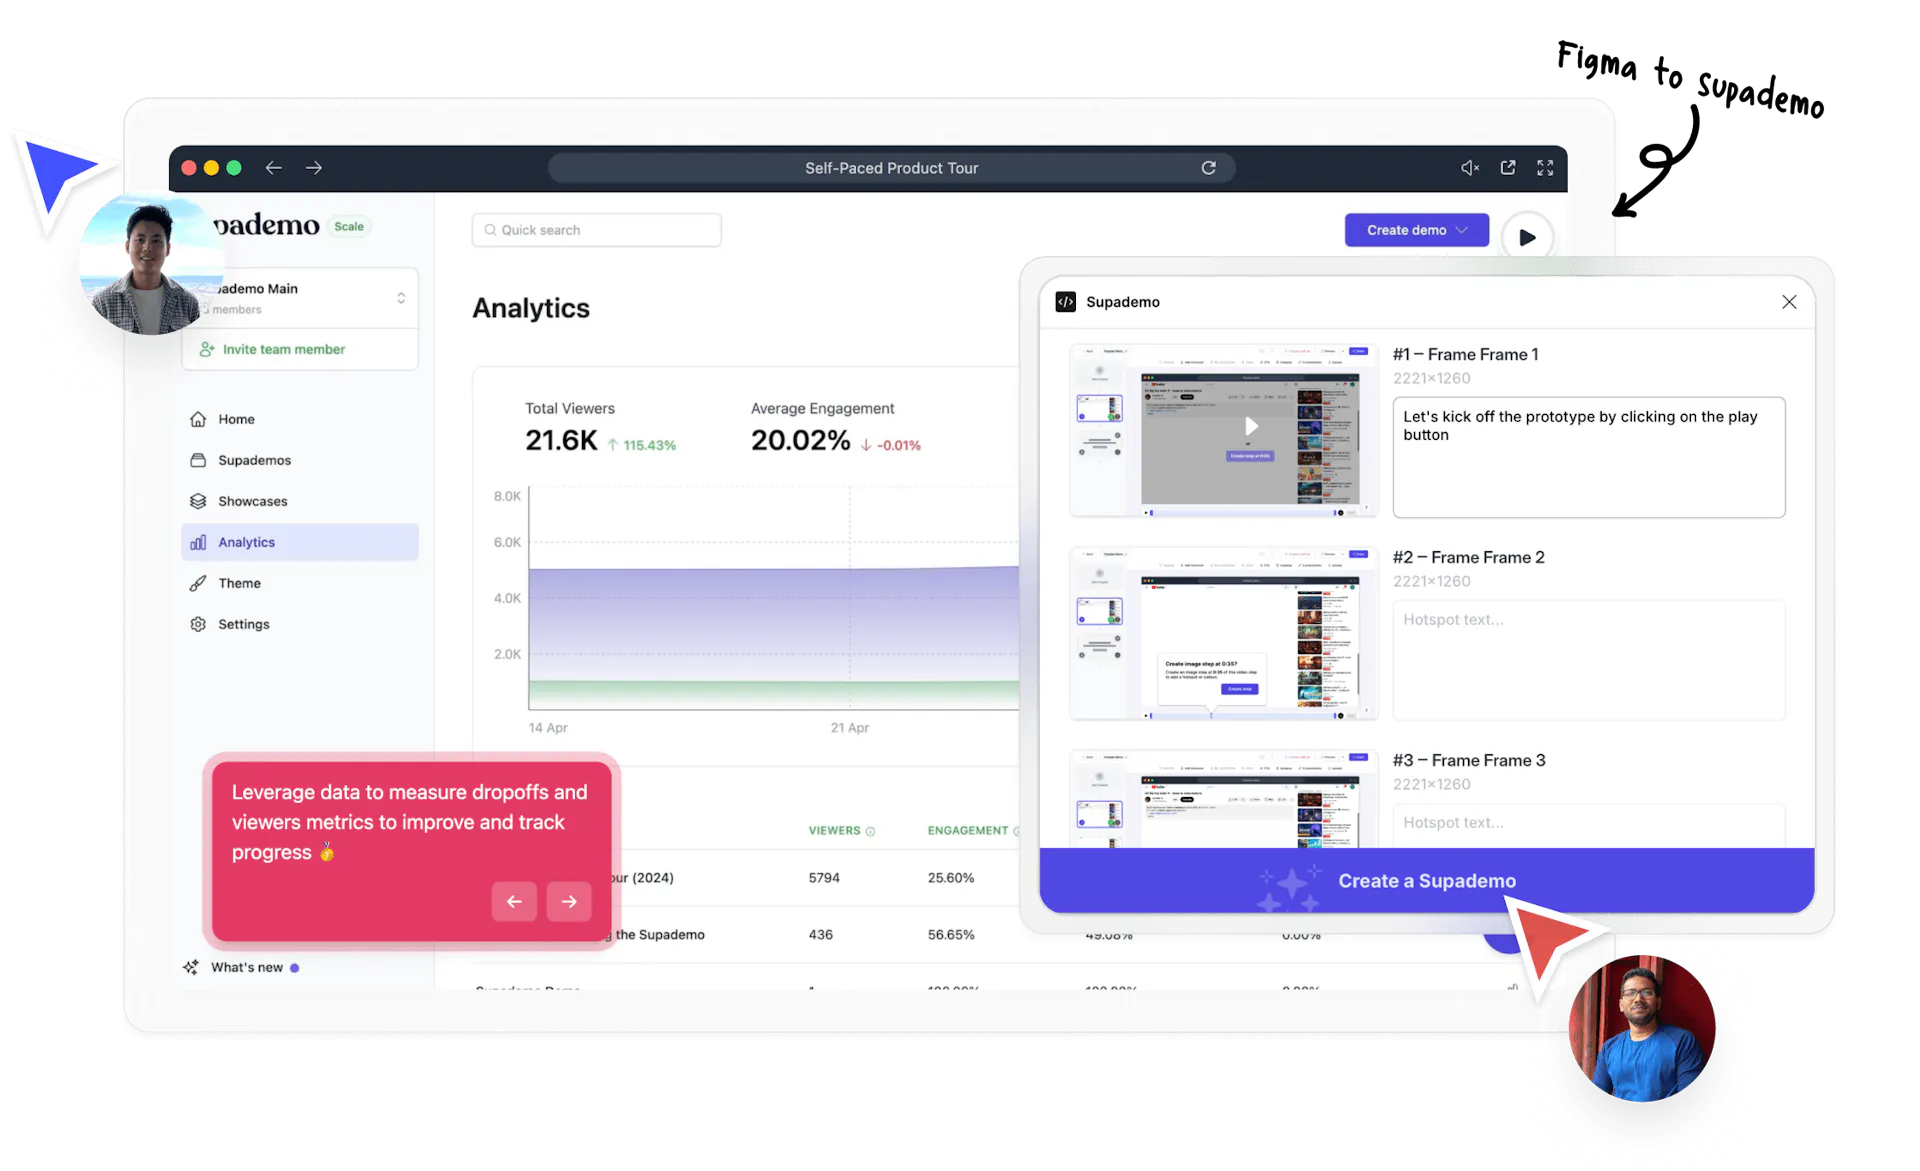
Supademo just launched its super-intuitive Figma plugin that lets you easily create interactive demos from within Figma in < 5 mins.
Step 1. Login to Supademo
- First, turn on the plugin and log in or sign up for a new Supademo account
Step 2. Select Your Frames
- Choose the Figma frames you want to include in your prototype
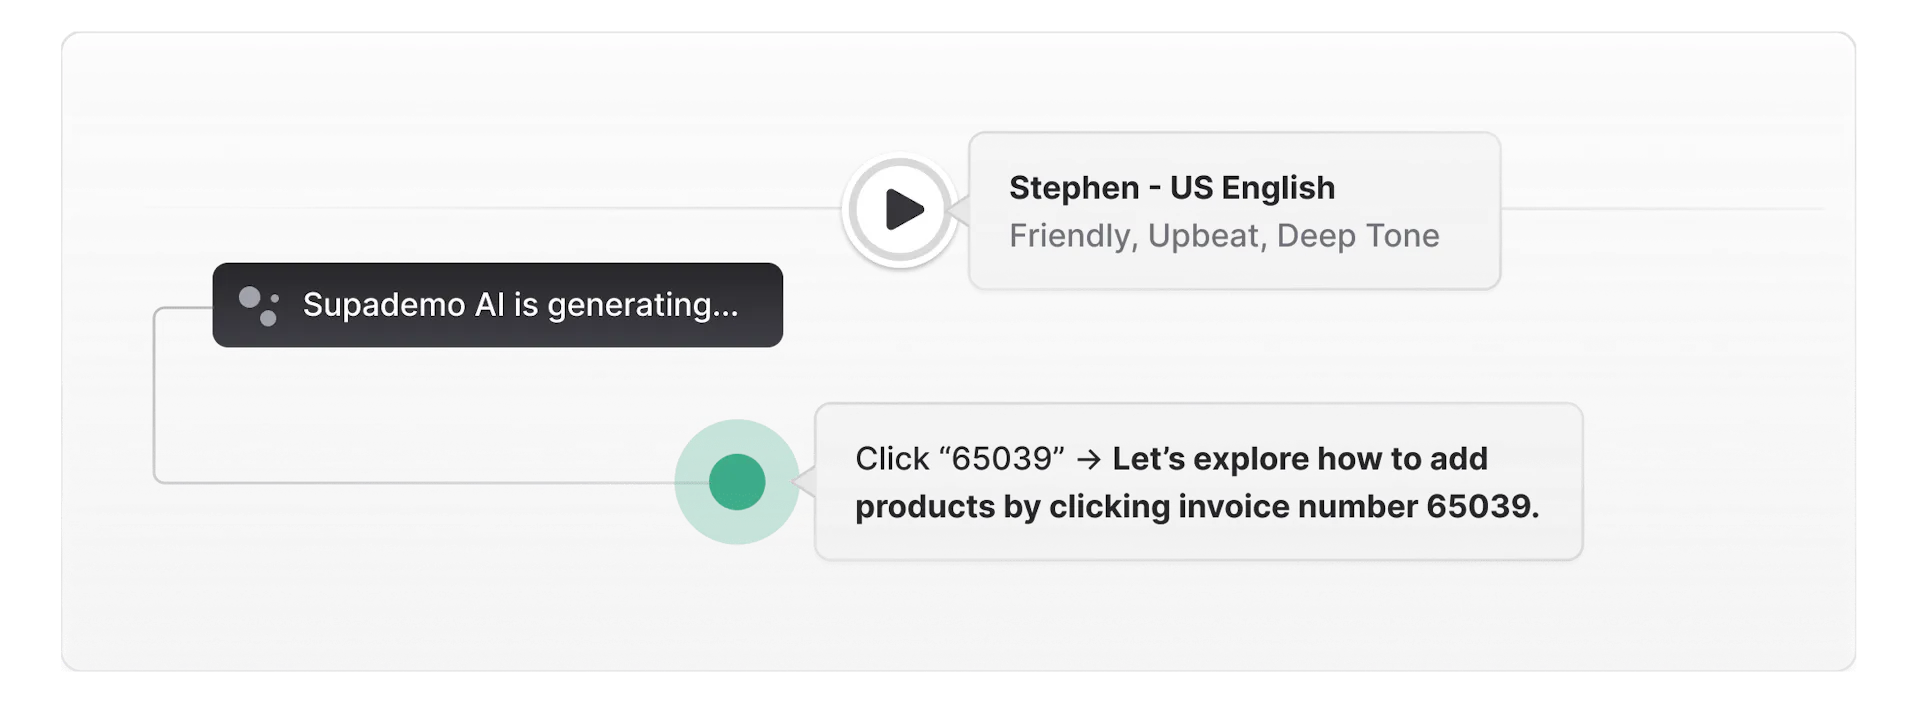
Step 3. Add Context with Annotations
- Rearrange steps/frames (if required) and insert text annotations to guide users through each step
Step 4. Generate Your Supademo
- Click "Create a Supademo" in the plugin
- Watch as your static frames transform into an editable, interactive link
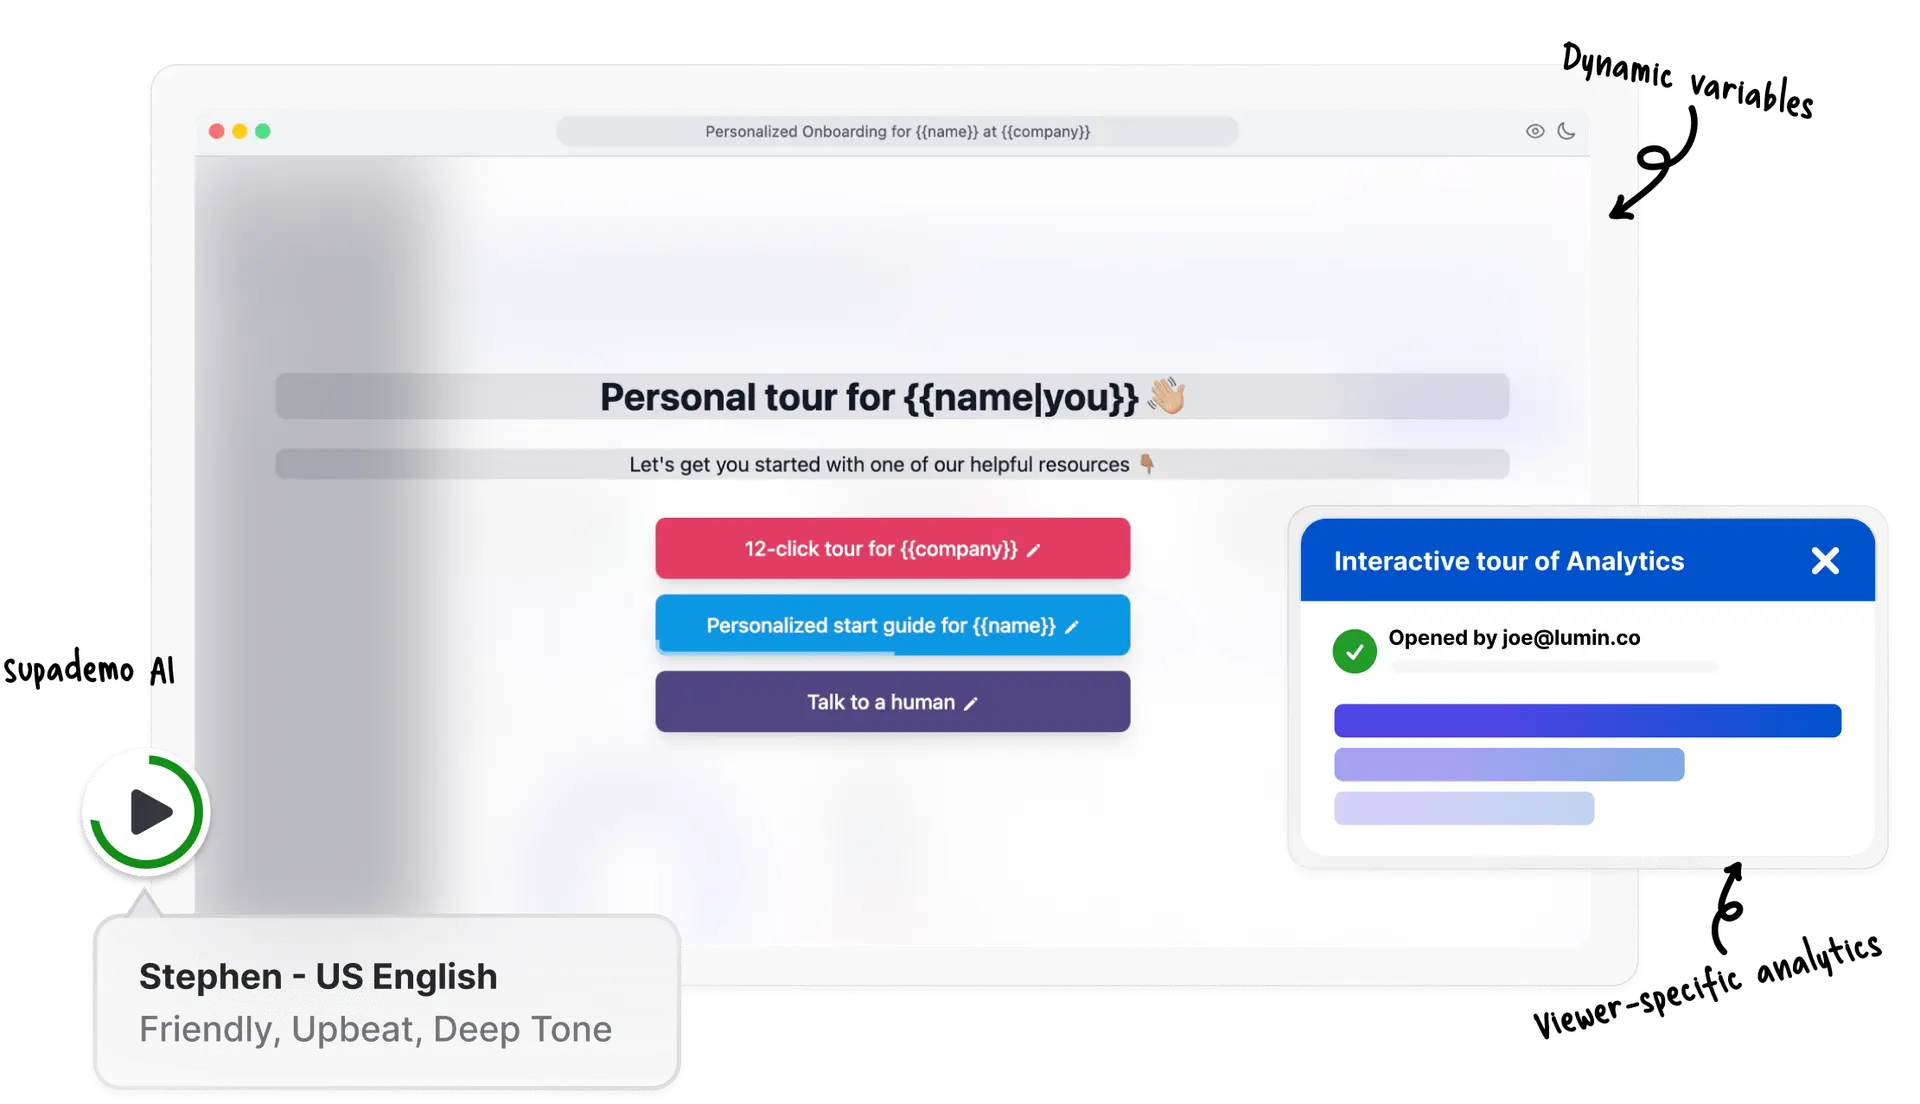
Step 5. Personalize Your Prototype
- Add engaging voiceovers to explain features
- Implement email gating or password protection for exclusive access
- Incorporate animations to highlight key areas
- Apply your brand colours and logos for a polished look
- Create conditional branching for a tailored user experience
Step 6. Share and Track
- Distribute your prototype via a unique link
- Embed it directly on websites or in documentation
- Export as MP4 or GIF for presentations
- Monitor viewer engagement, track dropoffs, and gather insights
Create interactive prototypes using the Supademo App 👇🏽
You can also convert your Figma designs into interactive demos by manually exporting all your Figma frames and uploading them on the Supademo app.
Step 1: Export Figma Frames
- Open your Figma project and select the screens you want to include in your demo.
- Click on "Export" in the right panel.
- Choose your desired resolution (we recommend 2x for crisp images).
- Click "Export layers" to save your frames as image files.
Step 2: Upload to Supademo
- Log in to your Supademo dashboard.
- Click "Create demo" and select "Create from uploads".
- Click "Upload images" and select all the Figma frame exports you want to include.
Step 3. Add Context with Annotations
- Rearrange steps/frames (if required) and insert text annotations to guide users through each step
Step 4: Personalize Your Prototype
- Add engaging voiceovers to explain features
- Implement email gating or password protection for exclusive access
- Incorporate animations to highlight key areas
- Apply your brand colours and logos for a polished look
- Create conditional branching for a tailored user experience
Step 5. Share and Track
- Distribute your prototype via a unique link
- Embed it directly on websites or in documentation
- Export as MP4 or GIF for presentations
- Monitor viewer engagement, track dropoffs, and gather insights
✨ Use hotspots strategically to guide user attention
✨ Leverage branching to create multiple user paths
✨ Keep voiceovers concise and informative
✨ Regularly check analytics to refine your prototype
Benefits of creating an interactive Figma prototype through Supademo
Aside from ease of use and faster prototyping demos with less effort, there are several key benefits of using Supademo for Figma prototyping:
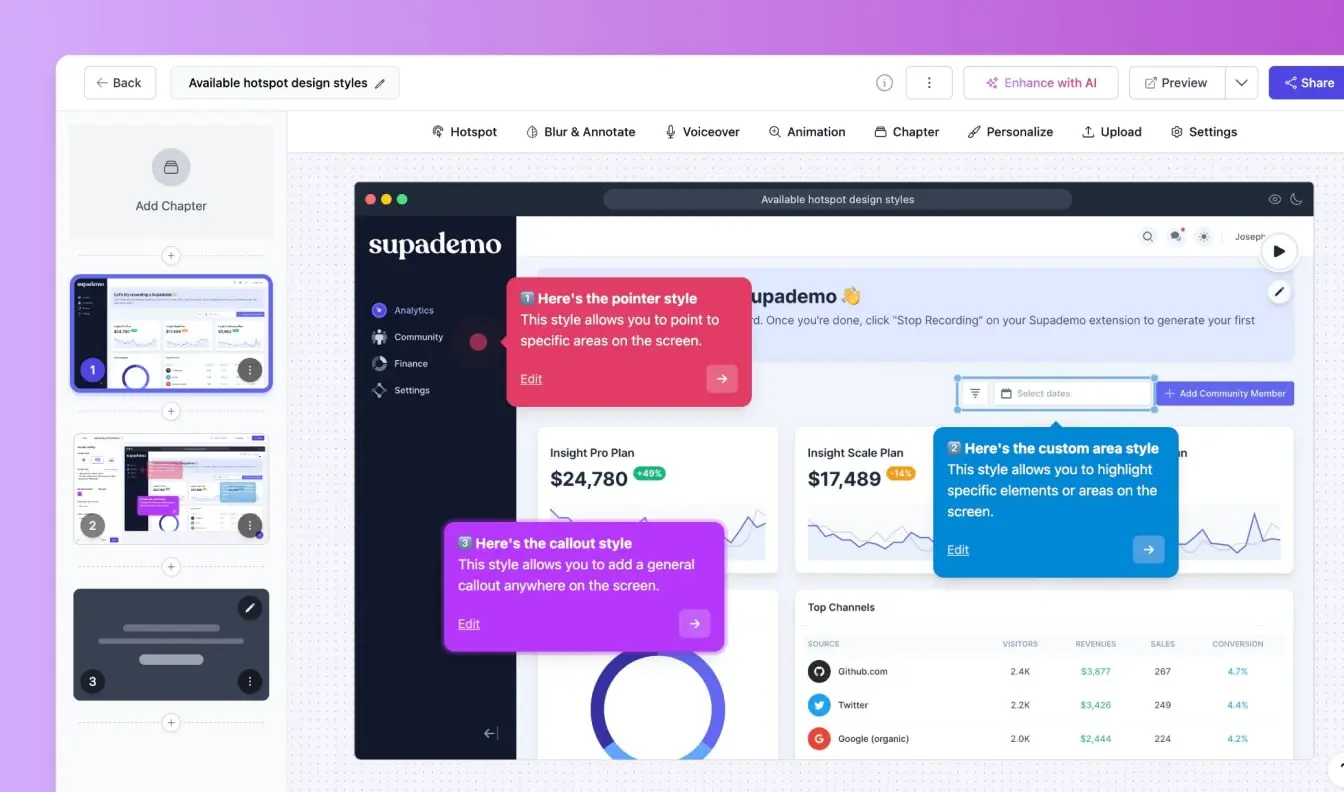
- Add dynamic hotspots and text annotations to add context to your Figma prototype;
- Share your Figma prototype through a custom domain or professional URL;
- Add AI-powered voiceover or text translations in seconds;
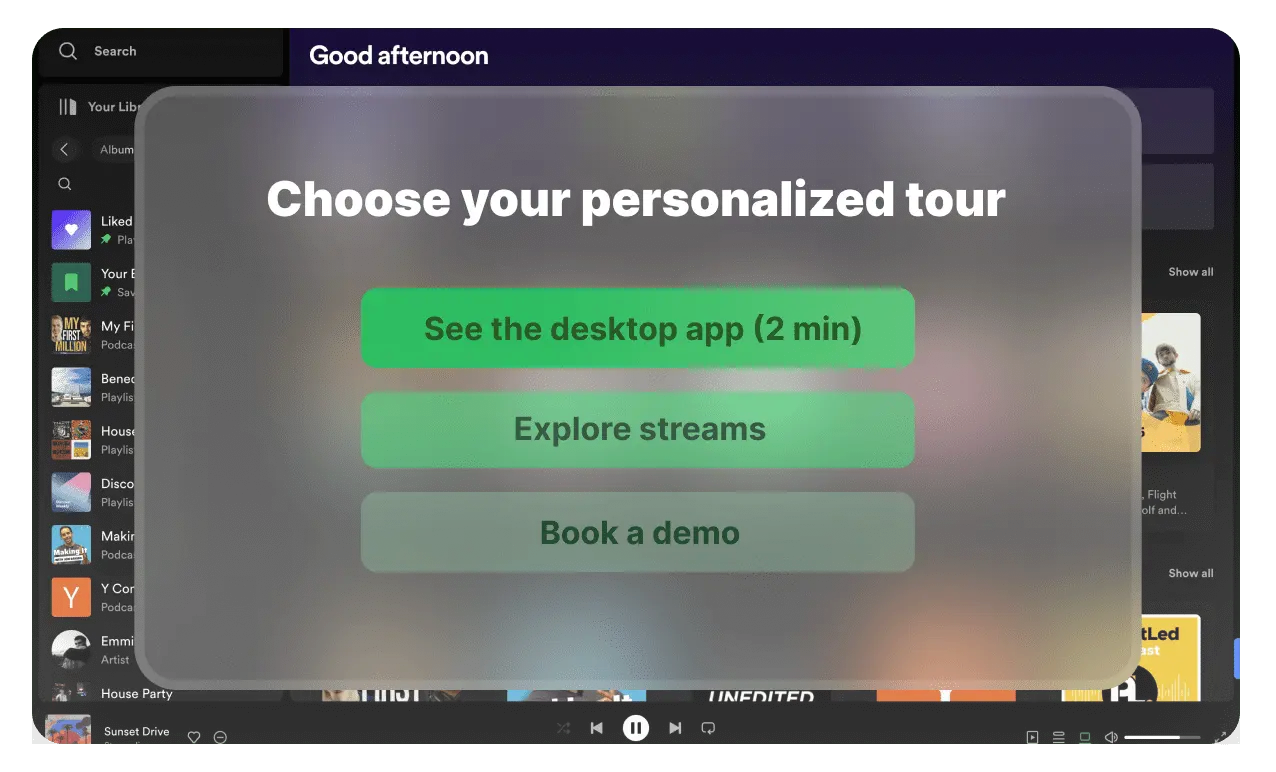
- Add overlays for context or CTAs to drive action (eg: adding a Calendly link to book a design discovery call)
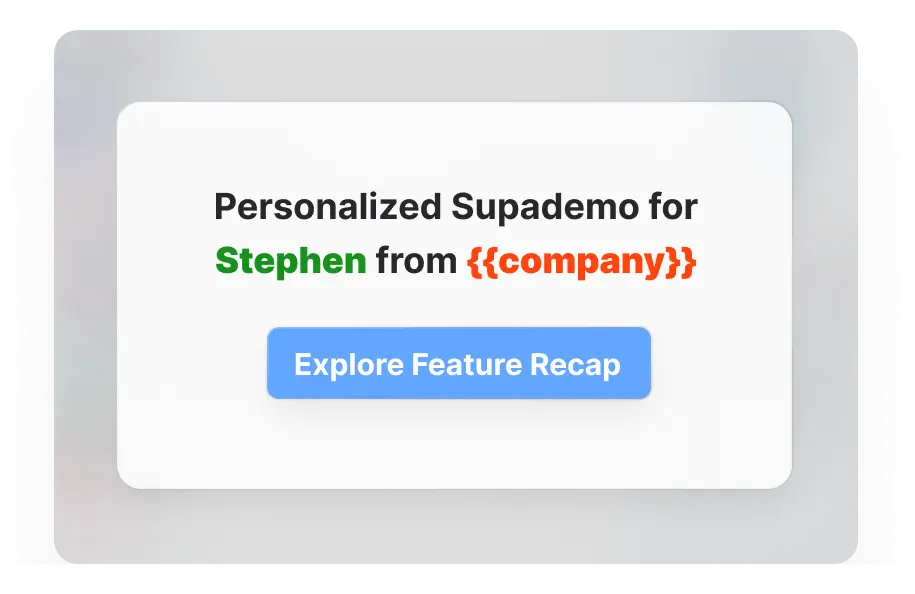
- Personalize your interactive Figma prototypes with dynamic variables to add viewer name, company, etc.
- Visually indicate clickable elements across your Figma prototype;
- Ensure your Figma prototype is responsive for mobile and desktop screens;
- Get detailed interactive demo analytics;

As mentioned above, creating interactive Figma prototypes with Supademo offers significant advantages over traditional methods.
Here's how Supademo revolutionizes the product development process:
1. Rapid Prototyping & Validation: Save Weeks of Development Time
- Transform static Figma designs into fully interactive demos in minutes, not days
- Reduce prototype creation time by up to 80% compared to coding from scratch
- Start gathering user feedback within hours of conceptualization
2. Data-Driven Decision-Making: Minimize Costly Development Mistakes
- Create and A/B test multiple feature versions without any coding
- Collect user feedback 3x faster than with traditional prototyping methods
- Make informed decisions based on real user data, potentially saving months of misdirected development
3. Streamlined Feedback & Iteration: Cut Review Cycles in Half
- One-click conversion from Figma to Supademo eliminates tedious export processes
- Share interactive demos instantly, reducing feedback turnaround time by 50%
- Implement changes rapidly, allowing for 2-3x more iteration cycles in the same timeframe
4. Enhance User Adoption: Boost Feature Adoption Rates
- Create embedded interactive walkthroughs in 75% less time than coding them
- Increase new feature adoption rates by up to 60% with in-app interactive guides
- Reduce support tickets by 30% by providing intuitive, interactive documentation
5. No-Code Solution: Democratize Prototype Creation
- Eliminate the need for specialized coding skills, saving on development resources
- Enable designers and product managers to create high-fidelity prototypes independently
- Reduce dependency on engineering teams by up to 70% during the prototyping phase
6. Cost-Effective: Significant ROI on Product Development
- Cut prototyping costs by up to 60% compared to traditional development methods
- Reduce the risk of building unwanted features by validating ideas early
- Accelerate time-to-market by weeks or even months, providing a competitive edge
✨ Validate ideas 3x faster
✨ Gather user insights from 5x more users due to easier sharing
✨ Make data-driven decisions with 80% more confidence
✨ Ship better, user-focussed features up to 50% faster
This is just one of the many use cases of leveraging Figma Prototypes with Supademo.
What is the difference between prototyping in Figma vs. Supademo
| Feature/Aspect | Figma Prototyping | Supademo |
|---|---|---|
| Time to Build | Time-consuming, especially for complex prototypes | Faster creation process, especially with bulk upload feature |
| Ease of Use | Requires specialized technical knowledge | More user-friendly, suitable for both designers and product managers |
| Linking Screens | Can be complicated to link multiple screens and buttons | Simplifies the process of connecting screens and interactions |
| Iteration | Difficult to keep updated or make minor changes | Easier to iterate and make quick updates |
| User Perception | May be perceived as a non-working prototype | Appears more like a finished product, increasing user trust |
| Responsiveness | Usually not responsive for different devices/screen sizes | Ensures responsiveness across mobile and desktop screens |
| Embedding | Limited embedding options | Easy to embed in websites, documentation, and onboarding materials |
| Autoplay | No built-in autoplay feature | Ability to autoplay the experience like a video |
| Overlays and CTAs | Difficult to add context or calls-to-action | Easily add overlays for context and CTAs to drive action |
| Voiceover | No built-in voiceover feature | Supports both custom and AI-powered voiceovers |
| Translation | No built-in translation feature | Supports translation in 15+ languages |
| MVP Validation | Limited capabilities for MVP validation | Designed to help teams validate MVPs effectively |
| Collaboration | Real-time collaboration on design | Facilitates team communication and product adoption |
| Password Protection | Limited access control options | Offers password protection for demos |
| Email Forms | No built-in email capture functionality | Allows integration of email forms within demos |
| Demo Analytics | Limited analytics capabilities | Provides detailed analytics on demo engagement and user behavior |
An example of an interactive Figma prototype demo - Supercharged with Supademo
Conclusion
Product managers and product designers are increasingly looking for simple, fast ways to create interactive Figma prototypes. By uploading your existing Figma screens to Supademo, product professionals can rapidly create high-fidelity, interactive prototypes and validate new features seamlessly.
Ready to try creating interactive Figma prototypes with Supademo? Download the free plugin here, no credit card required!
FAQs
What is Figma prototype?
A Figma prototype is a clickable, interactive representation of a design that simulates user interface behavior. It allows designers to test user flows, interactions, and gather feedback before development.
How do I run Figma prototype?
To run a Figma prototype, click the "Present" button in the top-right corner. Navigate through your prototype using predetermined interactions like clicks or swipes.
Can Figma prototypes be interactive?
Yes, Figma prototypes can be interactive. You can add clickable areas, transitions, and animations to create a dynamic user experience within the Figma environment.
What are the limitations of Figma prototype?
Figma prototypes have limitations in complex interactions, realistic data representation, and performance testing. They also lack advanced features like conditional logic and real-time data integration.
What is Figma not good for?
Figma is not ideal for high-fidelity prototyping, complex animations, or creating fully functional applications.
What is the best way to create interactive prototypes for Figma designs?
The best way to create interactive prototypes for Figma designs is using Supademo. It offers advanced features like branching, analytics, and easy sharing without coding.
