Are you trying to screen record on a Mac?
Whether you’re creating training guides for employees, explainer videos for customers, or quick feedback for your team, you’re in the right place.
To broadly categorize, there are two main ways to screen record on Mac
- Using the built-in macOS screen recorder.
- Using more efficient tools like Supademo that offer advanced features.
In this guide, we’ll walk you through both methods in detail.
Let's get started.
TL;DR
➔Supademo is built for business use: screen + webcam recording, instant link sharing, lightweight files, interactive elements, engagement tracking, and reusable demo libraries.
➔Use Mac’s recorder for quick, personal clips. Use Supademo when you need professional, shareable, and trackable recordings for training, onboarding, customer support, or sales.
How to record your screen on a Mac?
Mac's built-in screen recording tool is simple to use and requires no additional software. Here's the step-by-step process:
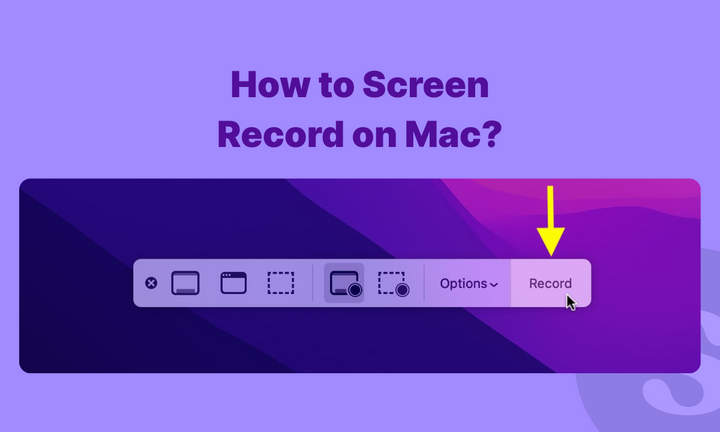
Step 1: Open the screenshot toolbar
Press Command + Shift + 5 on your keyboard. This brings up a small toolbar at the bottom of your screen with different recording options. Alternatively, you can access this through QuickTime Player by going to File > New Screen Recording.
Step 2: Choose what to record
You'll see two recording options in the toolbar:
- Entire screen: Capture everything on your display.
- Selected window: Hover and click on the app window you want.
- Custom area: Drag to select a portion of your screen.
Step 3: Set up your recording options
Before you start recording, click Options to customize your settings:
- Choose where to save your recording (desktop is the default)
- Set a countdown timer (5 or 10 seconds) if you need time to prepare
- Turn on your microphone to record your voice along with the screen
- Enable "Show Mouse Clicks" to highlight where you click during recording
Step 4: Start recording
Click the red Record button. If you chose "Record Entire Screen," click anywhere on your screen to begin. If you selected "Record Selected Portion," drag to select the area you want to capture, then click Record.
Step 5: Stop recording
When you're finished, click the stop button in your menu bar at the top of the screen. You can also press Command + Control + Escape to stop recording.
Your recording will automatically save to your desktop or your selected location as a .mov file. A small thumbnail will appear in the corner - click it to edit or share your recording right away
What are the limitations of Mac's built-in screen recorder?
While Mac's built-in Screenshot Toolbar and QuickTime Player are convenient and free, they come with several important limitations that may require you to consider third-party alternatives for more advanced recording needs.
1. No built‑in editing
Mac's built-in screen recorder offers only basic trimming and splitting functions. There's no support for text overlays, combining clips, color correction, multi-track audio editing, or transitions - requiring separate video editing software for this purpose.
2. Restricted export format options
The built-in recorder only saves files in .mov format. While this works well within the Apple ecosystem, it can create compatibility issues when sharing with Windows users or uploading to certain platforms that prefer other formats like MP4.
3. No default system audio recording
Cannot capture system audio (internal sounds from your Mac) natively. This prevents recording audio from video calls, music, games, or app notifications without using third-party software
4. Absence of camera overlay features
The built-in recorder cannot simultaneously capture your webcam while recording your screen. This makes it harder to add personal context or guide viewers through what you’re showing.
5. Limited collaboration and sharing
Recordings are saved locally on your desktop. If you want to share them, you have to upload the file manually to email, cloud storage, or chat apps.
6. No engagement analytics
Mac's built-in screen recorder provides no performance insights into your video. You cannot track view counts, watch time, audience engagement metrics, drop-off points, or user interactions.
7. Large file sizes and storage
Screen recordings create surprisingly large files even for short videos - a simple 10-minute tutorial can easily reach 1-2GB. This quickly fills Mac storage space, makes email sharing impossible due to attachment limits, and creates challenges when uploading to social platforms or cloud storage.
For businesses creating regular video content or requiring collaboration features, these limitations can significantly impact productivity and workflow efficiency.
How to screen record on Mac using Supademo?
Supademo is a modern screen recording and interactive demo platform designed specifically for teams who need more than just a raw video file. With its Chrome extension, you can capture your screen and webcam in one click, trim clips instantly, and share them with a simple link. Here’s how it works:
Step 1: Install the Supademo Chrome extension.
Start by adding the Supademo Chrome extension to your browser. Once installed, you’ll see the Supademo icon in your toolbar, ready to use whenever you need it.
Step 2: Choose recording mode
Click the extension and pick how you want to record. You can capture just your screen, just your webcam, or both at the same time.
The screen + camera option is especially useful if you want to guide viewers with a face-to-face explanation while showing what’s on screen.
You can also decide if you want to record a tab, a window, or your entire desktop, giving you more flexibility than Mac’s native tool.
Step 3: Record and trim your clip
Hit record and walk through your process. When you stop, Supademo opens a preview editor where you can:
- Trim the beginning and end.
- Mute or unmute audio.
- Zoom in on the timeline for precise edits.
This makes sure your final clip is clean without having to open another editing tool.
Step 4: Save and share instantly
When you’re happy with the video, you can save it directly to your Supademo workspace. From there, you have options:
- Keep it as a standalone video.
- Add it as a step in an existing interactive demo.
- Or start fresh by creating a new interactive demo with the video as the first step.
Unlike Mac’s built-in recorder, which saves bulky files to your desktop, Supademo gives you a single shareable link you can drop into Slack, email, or docs. If you need offline access, you can also download the video file to your computer.
Step 5: Track engagement
With Mac’s recorder, once you share a file, you have no way of knowing if anyone watched it. Supademo gives you engagement insights.
You can see who viewed the video, how long they watched, and where they dropped off.
This makes it easy to follow up with the right context, whether you’re training a new hire, sending a customer walkthrough, or sharing feedback with your team.
Why choose Supademo over Mac's built-in recorder?

Mac's built-in recorder is perfect for capturing a quick bug report or saving a funny moment from your screen. But if you're running a business, you'll quickly hit its limits.
Think about it: when you record a customer walkthrough using Mac's tool, you end up with a 2GB file sitting on your desktop. Now what? You can't email it (too big), uploading to Slack takes forever, and your customer gets a clunky .mov file that might not even play on their Windows computer.
Suapdemo is purpose-built for businesses that want to:
- Scale communication with ease: Record once, share instantly with a lightweight link that works everywhere. No file size limits, no compatibility issues.
- Add a human touch to videos: Capture your screen and webcam simultaneously, so prospects see both your product and your face—building trust and connection that static recordings can't match.
- Turn viewers into active participants: Add clickable hotspots, guided tours, and interactive elements that transform passive watchers into engaged learners who actually retain what they see.
- Measure engagement: See who watched your content, how long they stayed engaged, and exactly where they dropped off. When a prospect spends 10 minutes exploring your demo, you know they're serious.
- Create once, use everywhere. Whether it's onboarding new hires, training customers, or sending personalized sales demos, Supademo helps you build a library of reusable, interactive content that actually gets results.
Ready to upgrade from basic screen recordings to produce professional, personalized videos? Try Supademo for free!
FAQs
Why won't my Mac screen recording capture system audio?
Mac's built-in recorder only captures your microphone, not internal sounds from apps or videos. For system audio, you'll need third-party tools like BlackHole or use Supademo which handles this automatically.
Why can't I email my screen recordings?
Email limits are around 25MB, but Mac recordings often hit 1-2GB. Upload to Google Drive and share the link instead, or use Supademo's instant sharing links.
What’s a better alternative to screen record on Mac?
Supademo offers one-click Chrome extension recording with simultaneous screen and webcam capture, instant shareable links, interactive elements, and built-in engagement analytics, perfect for training, sales demos, and team collaboration without large files or compatibility headaches.


