Effortlessly crunch numbers and calculate totals with Google Sheets' powerful SUM function. Simplify your data analysis, unlock valuable insights, and save time by summing up values in a few simple steps, making complex calculations a breeze. This comprehensive guide provides you step by step instructions on how to do sum function in Google Sheets.
Who is Google Sheets best suited for?
Google Sheets is best suited for a wide range of professionals, including Financial Analysts, Project Managers, and Data Analysts. For example, Financial Analysts can use Google Sheets for creating financial models and analyzing budgets, Project Managers can leverage it for tracking project timelines and resources, and Data Analysts can use it for organizing, processing, and visualizing data, all benefiting from Google Sheets’ powerful collaboration features and data processing tools.
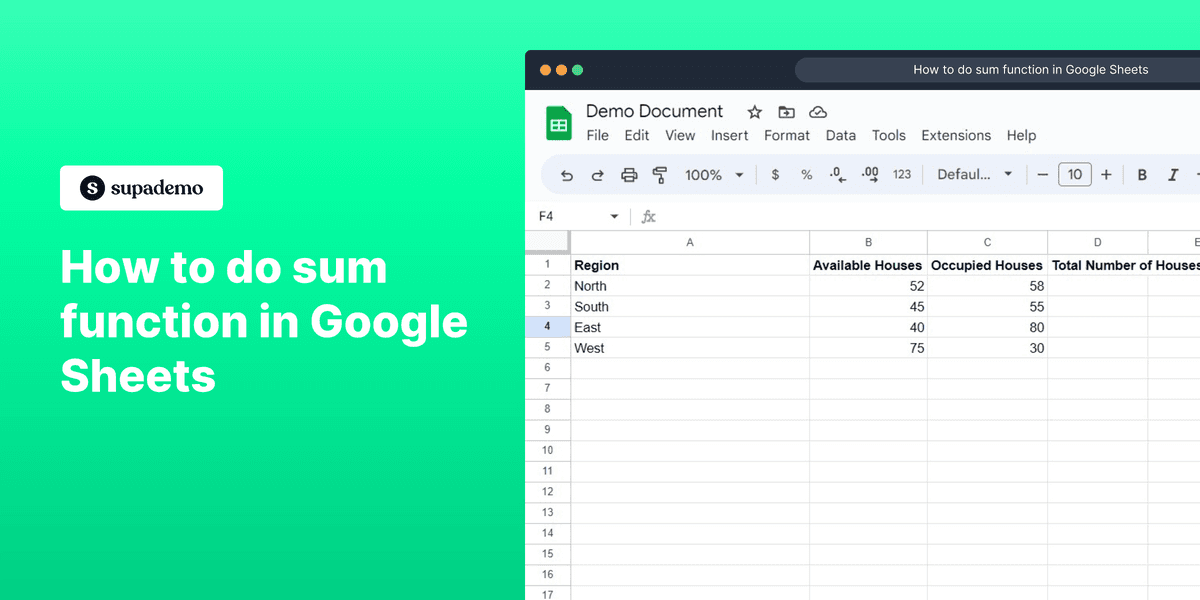
1) Navigate to Google Sheets. Create or open a document.
2) Click on the cell where you want to carry out your sum formula.
3) Put in the sum formula in the cell [(Column number & row number)+(Column number & Row number)]
4) The Answer will appear after hitting enter.
5) From the corner of the cell drag down the cursor for the answer to appear for the rest of the cells.
Common FAQs on Google Sheets
Commonly asked questions about this topic.
How do I use formulas in Google Sheets to perform calculations?
In Google Sheets, formulas are used to perform calculations and manipulate data. To use a formula, click on the cell where you want the result to appear, then type an equals sign = followed by the formula. For example, to add the values in cells A1 and B1, you would enter =A1+B1. Google Sheets supports a wide range of formulas, including basic arithmetic (SUM, AVERAGE, MIN, MAX), text functions (CONCATENATE, LEFT, RIGHT), and more complex functions like IF, VLOOKUP, and INDEX MATCH. You can also apply formulas to entire ranges of cells by dragging the fill handle (a small square at the bottom-right corner of the selected cell) across the desired range. Sheets automatically updates the formula references relative to each cell's position.
How can I collaborate with others in real-time on a Google Sheets document?
To collaborate on a Google Sheets document, click the “Share” button in the top-right corner of the screen. Enter the email addresses of the people you want to collaborate with and set their permissions (e.g., “Viewer,” “Commenter,” “Editor”). You can also generate a shareable link to provide access to others. Once shared, multiple users can edit the sheet simultaneously, with real-time updates visible to all collaborators. You can see who is viewing or editing the document by their colored cursor or avatar in the top-right corner. Use the “Comments” feature to leave feedback or discuss specific cells, and tag collaborators by typing “@” followed by their name or email address.
What are some tips for organizing data in Google Sheets?
Organizing data in Google Sheets can make it easier to analyze and manage. Use the following tips for better organization: Freeze Rows and Columns: Freeze the header row or important columns to keep them visible while scrolling through large datasets. To do this, go to View > Freeze and select the rows or columns you want to freeze.
Sort and Filter Data: Use the “Sort” function to arrange data in ascending or descending order based on specific columns. Apply filters by clicking on Data > Create a filter to show only the data that meets certain criteria.
Use Conditional Formatting: Highlight important data automatically by setting up conditional formatting rules. Go to Format > Conditional formatting and define the criteria, such as highlighting cells greater than a certain value.
Use Named Ranges: Assign names to specific cell ranges to make formulas easier to read and manage. Go to Data > Named ranges to create and manage named ranges.
Create Data Validation Rules: Ensure data consistency by setting up data validation rules. Go to Data > Data validation to restrict input in a cell to specific values, such as a list of options or a number range.
Create your own step-by-step demo
Scale up your training and product adoption with beautiful AI-powered interactive demos and guides. Create your first Supademo in seconds for free.
Frequently Asked Questions about how to do sum function in google sheets
Commonly asked questions about this topic.
How do I save and share SUM formulas with my team in Google Sheets?
Capture the end-to-end process with annotated screenshots or clickable walkthroughs — written-only SOPs often go unread. Tools like Supademo let you record the exact steps in Google Sheets, creating a living reference that stays current with UI changes. Store documentation where your team already works, not in a separate wiki they'll forget to check.
According to the State of Interactive Demos 2026 report, teams that update demos weekly or monthly see ~18% higher impact than those updating only for major releases.
What's the most efficient way to use SUM across multiple sheets collaboratively?
Google Sheets supports real-time collaboration where multiple team members can view and edit simultaneously. Features like commenting, @mentions, and activity logs help keep communication in context. Set clear editing permissions — having too many editors without structure leads to version conflicts and confusion. Learn more about Supademo's features.
Processmaker saved hundreds of hours by replacing manual demo processes with interactive walkthroughs. Over 150,000 professionals across industries trust Supademo for interactive demos, and the platform holds a 4.7/5 rating on G2 based on verified user reviews.
What are the key features of Google Sheets for do sum function?
Google Sheets provides built-in do sum function capabilities including customizable templates, real-time collaboration, and integration with other productivity tools. The exact feature set depends on your plan tier — free plans typically cover basics while paid plans unlock automation, advanced views, and admin controls. Evaluate which features align with your team's actual workflow before committing.
To illustrate, users report an average 85% time savings on demo creation with Supademo.
What are the most common errors when writing SUM formulas and how do I fix them?
Start by defining your objectives clearly before configuring anything. Keep the structure simple and focused — avoid overloading with unnecessary fields or detail that nobody references. Review and update regularly with your team to catch stale information early, and assign clear ownership so nothing falls through the cracks.
54% of top-completing demos use AI voiceover to improve the guided experience.
Is Google Sheets suitable for enterprise-scale doing sum function?
For enterprise teams, evaluate Google Sheets's admin controls, SSO support, permission granularity, and audit logging capabilities. Scalability depends on your specific do sum function complexity — what works for a 10-person team may need structural changes at 500+.
Most platforms offer enterprise plans with dedicated support and custom SLAs. Supademo is rated #1 for easiest setup and fastest implementation on G2.
What integrations does Google Sheets support for doing sum function?
Google Sheets typically integrates with popular tools like Slack, Google Workspace, Microsoft 365, and Zapier for cross-platform automation. These integrations help connect doing sum function workflows with your existing tech stack. Check Google Sheets's integration marketplace for specific connectors relevant to your use case.
Interactive demos see 7x higher conversion rates compared to traditional demo videos. VRIFY saved over $100k by switching to interactive demos for enablement.
What common mistakes should I avoid when doing sum function?
The biggest mistake is overcomplicating the setup — adding too many fields, views, or automations before validating the basic workflow. Another common issue is inconsistent naming conventions, which makes searching and filtering unreliable at scale. Finally, skipping regular reviews leads to outdated do sum function data that erodes team trust in the system.
Research confirms this — the State of best arcade alternatives for 2026s 2026 report found that 78% of teams now use interactive demos in 2 or more use cases.
Justin James
Justin is a growth intern focused on content generation and marketing. He's passionate about making an impact across various startup roles.
Learn how to easily remove the 'Powered by Shopify' text from your online store with step-by-step instructions and tips to customize your Shopify storefront.
Learn step-by-step how to add products to your Shopify store effortlessly, including tips on product details, images, pricing, and inventory management to boost your online sales.
Learn step-by-step how to deactivate your Shopify store easily, including important considerations and tips to pause or close your shop without losing data.
Learn how to easily remove the 'Powered by Shopify' text from your online store with step-by-step instructions and tips to customize your Shopify storefront.